Wednesday, December 11, 2013

Taters!

I love potatoes almost any way they are fixed. No cheese of any kind and no mashed taters. I'll take a baked potato any time. Add butter salt and pepper, but no mashed. So if you read my blog about getting healthier, you know I've had to change some things. But I need more change so last night for supper I tried something new for me. I took 4 small potatoes, peeled and wedged them (quartered in wedges), tossed them with about a tablespoon of olive oil, (which I've never used before), a few twists of sea salt, about a teaspoon of parsley flakes, and a pinch each of thyme and oregano. First I placed them in a shallow baking dish, added about 3 slices of onion and covered with foil, 350 degree oven, (I was cooking other stuff), after 20 minutes progress seemed slow so I covered with Saran Wrap (remember it's HOT and you must not burn yourself!!) and nuked them about 10 minutes and raised the oven to 450 degrees and removed the plastic wrap and finished them off in about 20 minutes they were done. And can I cay yum?! Yes I can. This serves 4! Beth said she often fixes taters this way and sometimes adds garlic and Parmesan cheese. Garlic I can handle.... Not cheese! Anyway. If you've never fixed taters this way, try them! It was great!! 


My taters with homemade sloppy joe on a homemade bun. All these recipes are in this blog! 

Happy cooking!
To be continued......

Saturday, December 7, 2013

Homemade Christmas Gift (Homemade Hot Fudge Sauce)

Who doesn't love hot fudge on their ice cream?! Did you know you can make it at home and put it in a jar, decorate that jar and give it as a homemade Christmas gift? It's so easy thanks to the Land O' Lakes folks! Visit them on twitter @LandOLakesktchn for lots of #Christmasideas!! 

Home made hot fudge sauce
1 can sweetened condensed milk
1 cup semi-sweet chocolate chips
1 stick Land O' Lakes butter
Combine all ingredients in a saucepan and over low heat, stir until chips and butter are melted and mixture is smooth. Place in jars and store in fridge until ready to heat and use! Keeps for a week. 


Any brand sweetened condensed milk will do, but a name brand like carnation or eagle brand will work better-- be sure you are NOT using evaporated milk. 


Add one cup of your favorite semi-sweet chocolate chips


And a stick (1/2 cup) butter (Land O' Lakes of course!) 


It will soon begin to melt, stir often over low heat to avoid scorching! 


It's done! Yum! 


It was wonderful over plain yellow cake! Imagine it over that new Edy's peppermint ice cream! I need to go to Kroger!! 


Those used coffee drink bottles would be perfect! Add a homespun or Christmas ribbon, add a note that says carefully reheat as needed and store in the refrigerator! 


Or use a jelly jar! Perfect for giving!

Merry Christmas!
Happy Cooking!!

I love all y'all! 
To be continued!!

Recipe from the Land O Lakes twitter site. Cooking photos are mine! Jar photos are from a google search and are available readily on the internet! My plate is Fiesta! 


Thursday, December 5, 2013

Homemade Chili


Start by sauteeing a couple coarsely chopped onions in a couple tbsp oil for about 10 minutes over medium-low heat - until they begin to soften. Next, add 3 cans of your favorite chili beans. 


I use Bush's or Lucks- whatever is on sale and I use the mild chili sauce. You can mix it up and use one or two cans of the hot; your chili will be hotter! 


Stir these around and let them begin to cook just a bit. 


Now, I stir in some chili powder


Maybe a tbsp or two.....


Then stir in a couple cans of diced tomatoes. On sale or store brands work well. I used Red Gold here. It was on sale at the Cee Bee.... Next, a lil more chili powder.... I tasted.


Now, while you bring this to a simmer, brown about a pound of ground beef, chuck or turkey


You want all the pink gone. Drain and add it in......


Give it a stir. All the elements of your chili are basically done now. You can taste and add salt, pepper, more chili powder if you desire, remember- you can't subtract so add just a little at a time! Now, cover and turn it on low and let it simmer - give it a stir occasionally. It will be ready to eat in about an hour! Enjoy! 


Wednesday, August 21, 2013

I love Fiesta Dinnerware!

So I know this is 'My Favorite Recipes' but presentation is also a consideration. In the country we don't always think about presentation- we just cook it and serve it up. But if you think about it, growing up do you have a memory of a special dish, cup or plate? I have a few! One is "the jello bowl" - mom made jello and cake most Sundays (the only day we had dessert) and I got to stir the jello! She used her bowl that had been her mothers. Back then I didn't consider what kind of bowl it was. Didn't know what Fiesta was. Here is a picture of that bowl. 
You can't buy a new Fiesta bowl this size. When I first started collecting Fiesta in the 1980's you couldn't. It wasn't until after our house burned and I started replacing my Fiesta that I realized what kind of bowl the jello bowl was/is!  Some day it will be my yellow bowl! Sorry Jeffrey! (My nephew and his wife also collect and use Fiesta!) 

I have a piece of Fiesta from several colors. A lot of my pieces are discontinued now. Some things don't come in those older colors like I don't have a periwinkle or rose gusto bowl. There is nothing like curling up on a cold winter evening with a gusto bowl full if hit homemade beef stew, chili or soup! Or sitting on the porch on crisp mornings with a hot cup of coffee!
And isn't this French toast beautiful on this Fiesta buffet plate?! 
Well, I think it is! 

I guess this is about all for today! Y'all have a blessed day! 
I love all y'all!❤
To be continued....


Monday, July 29, 2013

Baked Oatmeal

Today a friend posted she really wanted a recipe for baked oatmeal. She'd had an excellent serving of this recently popular dish. Being the friend I am, I found one from Taste of Home I thought she might like. She messages me on Facebook that she had made it for supper and it was yum. She added fresh peaches to hers. You can add about a cup of any fresh fruit you would like. Here it is! Baked Oatmeal. 


  • 3 cups quick-cooking oats
  • 1 cup packed brown sugar
  • 2 teaspoons baking powder
  • 1 teaspoon salt
  • 1 teaspoon ground cinnamon
  • 2 eggs ( if cholesterol is a concern use the whites or 2 egg portion of egg beaters)
  • 1 cup milk
  • 1/2 cup butter melted

Directions

  • Preheat oven to 350°. In a large bowl, combine oats, brown sugar, baking powder, salt and cinnamon. In another bowl, whisk eggs, milk and butter. Stir into oat mixture until blended.

  • Spoon into a greased 9-in. square baking pan. Bake 40-45 minutes or until set. Serve warm with milk. Yield: 9 servings.

Nutritional Facts

One serving equals 318 calories, 14 g fat (7 g saturated fat), 78 mg cholesterol, 492 mg sodium, 43 g carbohydrate, 3 g fiber, 7 g protein.

Originally published as Baked Oatmeal in Country Woman May/June 1993, p36

Friday, July 5, 2013

Home made "Pay Day" type bars

I've told y'all before in my other blog how every year for the Fourth of July we spend it with good friends who are like family. We all bring something and have a cookout. This year I was looking for something different and came across a recipe for home made payday bars. I made them and are they good! They were certainly a hit! 
Here's how to make them:
First spread 1 1/2 cups peanuts in an ungreased baking dish
Next:
2 1/2 tablespoons butter
2 cups peanut butter chips
Combine in a saucepan over medium heat and stir together until melted.
When this is melted remove from the heat and add 2 cups mini marshmallows and 1 14oz can sweetened condensed milk and stir until marshmallows are melted. 
Then this mixture is pretty stiff. Carefully spread it over the peanuts
Then sprinkle another 1 1/2 cups peanuts over the top. 
Next, chill thoroughly and cut into bars. These are very good!

I've made these twice now. The first time I had no peanut butter chips so I used 1 cup peanut butter as a substitute. It works well flavor-wise; however the finished product is a softer set than with the peanut butter chips. I made them again today- with the chips-  much better! 

Enjoy! And let me know how you liked them!

From Moore Minutes Blog

Monday, June 17, 2013

Pancakes


We love pancakes. Rick always hated pre-made mixes for pancakes, so I made them homemade most every time. The recipe I use is from my red and white check cookbook that I have had for many, many years. The pages are well worn. 


I use an electric griddle similar to this one to make my pancakes on. It is a good investment, I use it for a lot of cooking.
ingredients
  • 1cup all-purpose flour
  • 1tablespoon sugar
  • 2teaspoons baking powder
  • 1/4teaspoon salt
  • 1beaten egg
  • 1cup milk
  • 2tablespoons cooking oil

directions
1.In a medium mixing bowl stir together the flour, sugar, baking powder, and salt. Make a well in the center of the dry mixture; set aside.
2.In another medium mixing bowl combine the egg, milk, and cooking oil. Add egg mixture all at once to the dry mixture. Stir just till moistened (batter should be lumpy). {I always lightly beat the egg alone first, then with the other liquid ingredients then add to dry}
3.For standard-size pancakes, pour about 1/4 cup batter onto a hot, lightly greased griddle or heavy skillet. For dollar-size pancakes, pour about 1 tablespoon batter onto a hot, lightly greased griddle or heavy skillet. Cook over medium heat about 2 minutes on each side or till pancakes are golden brown, turning to second sides when pancakes have bubbly surfaces and edges are slightly dry. Serve warm. Makes 8 to 10 standard-size (4-inch) or 36 dollar-size (2-inch) pancakes (8 servings).


I always us White Lily unbleached bread flour for this.  

I also sometimes use an equal amount (or double the amount) of melted butter instead of oil for my pancakes. I love the buttery flavor.

The other day I was on Pinterest, and I found a recipe for iHop pancakes. I will be trying it and will share it here. I haven't used it yet but may soon.

Pinterest iHop Pancake recipe

IHOP pancakes

1 1/4 c. flour
1 tsp. baking powder
1 tsp. Baking soda
pinch of salt
1 egg, beaten
1 1/4 c. buttermilk
2 Tbsp. melted butter
1/4 c. sugar

Stir together the flour, baking soda, baking powder,and salt. Mix the egg with the buttermilk and add to the flour mixture, stirring only until smooth. Add the melted butter and sugar. Fry on a greased griddle. Serves 4. 

This is a link to the post the recipe came from:


Thursday, June 13, 2013

Homemade white bread


This recipe is my new favorite, and I love to make this bread often. I love it better than my bread machine bread. It is just as easy too! Not a lot of work to it at all! You can make bread! Please don't be intimidated!

First, let me say you don't need any fancy equipment either. It is easy with a bowl, wooden spoon, measuring cups and spoons and loaf pans. Seriously, that is all you have to have to make bread. It is easier if you have a kitchen aid or other stand mixer with a dough hook though. It helps with the kneading, which only takes about six minutes. Not difficult or time consuming at all!


This is ALWAYS in my refrigerator!!  It keeps very well! 

 *  *  *


White Bread

Makes 2 loaves

INGREDIENTS
3 cups luke-warm water
1/4 cup sugar
1 1/2 Tbsp. yeast
1/3 cup oil
1 Tbsp. salt
6 - 7 cups White Lily Unbleached Bread Flour  (unbleached ground white wheat flour can be used and you can use regular all-purpose flour with success as well.) I always use White Lily Unbleached Bread Flour and for this recipe, about 7 cups. Kroger and Walmart both carry it in the baking isle.

DIRECTIONS
In a large mixing bowl, dissolve yeast in warm water and sugar. Let sit 10 minutes. Add the oil. Add the dry ingredients starting with 6 cups of flour. Mix all together. Knead the dough thoroughly until all ingredients are incorporated, and dough is smooth, elastic, very slightly sticky, and pulls away from the bowl (6-10 minutes). As you knead the dough, you may add more flour as needed, and repeat the process until dough reaches the desired consistency. 

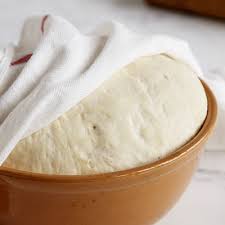
Cover the bowl of dough with a dish towel or plastic wrap and let rise until doubled (an hour or more depending on how warm your kitchen is.) You may speed up this process by placing the covered bowl inside the oven with the oven light on, and another bowl of warm water sitting on the lower rack.

*

Punch the dough down, divide and and form into 2 loaves. Place the dough in 2 greased bread pans. (I use 9" pans.) Cover and let rise till the top of the dough is an inch or two above the bread pans.


Bake at 375 degrees for 25 minutes. Remove the baked loaves from their pans immediately, and place on a cooling rack. Slice, and serve warm with butter and honey.

Store in an air-tight bag. Baked loaves AND bread dough freeze well. 

This bread also makes most excellent french toast. You will find my recipe for french toast in this blog. 

I believe in giving credit where it is due, and this recipe comes from Pennies and Pancakes Blog. Here is a link.  http://penniesandpancakes.blogspot.com/2012/09/grandmas-country-white-bread.html#.Ubnolm_AfcA

**some pictures are mine, some are from *Google images


Tuesday, June 4, 2013

Homemade Saltines

So I am out of crackers. I thought: if I can make buns, I can make crackers. So I did! 

And here's how I did it:

4 cups bread flour (White Lily)
1 tsp baking powder
1/2 tsp salt
Stir together and add:
3/4 cup shortening (Crisco)
(Cut in with 2 knives or pastry blender)
1 1/3 cups milk

Stir together until dough forms a ball. Divide into 4 sections. Roll out each section, one at a time, very thin 1/8 to 3/16 inches thick. Cut crackers with cookie cutter, biscuit cutter or pastry wheel. 


Place crackers on ungreased cookie sheet (I used my pampered chef pizza stone). Prick dough with fork several times each piece and sprinkle with salt. 

Bake at 375 degrees 12 to 20 minutes until golden brown.  Store in an air tight container. 


Yum! They are good. Didn't take long at all! 

Hope you try this and let me know!!